

How to Prepare a Social Media Banner with Canva
Creating a good social media banner won’t require you to have design skills or to use costly software. Thanks to Canva, every person is able to make a neat and colorful banner in no time. This guide will take you from selecting dimensions to saving the image, through all the steps in between that are very simple and can be easily followed.
This article is targeted at novices. If you are someone who has never tried designing anything, then there is no need to be concerned. Just do as per the steps in the sequence given.
What Is a Social Media Banner?
A social media banner is a sizable visual that is placed at the top of a social media profile or page. It is often the first thing that people notice when they come to your profile.
Typical examples are:
- Facebook page cover photo
- Twitter (X) header image
- LinkedIn profile or company banner
- YouTube channel banner
A banner serves the purpose of:
- Displaying the brand name or logo
- Announcing a message, offer, or sharing a news
- Giving an impression that is strong from the start
A proper banner appears to be neat, legible, and rightly proportioned.
Why Use Canva for Social Media Banners?
If you’re looking for an easy way to create banners, Canva is the tool for you. No installations are required. It runs straight from your browser.
Here is why Canva is a good choice:
- Cost nothing to use
- Templates are available for all major platforms
- Editor based on dragging and dropping
- Available on both desktop and mobile
- No skills in designing required
Even if you are a complete beginner, you can still make a banner in Canva using the first design tool.
What You Need Before You Start
Keep the following things ready before launching Canva:
- A Canva account (the free version is sufficient)
- Your brand name or page name
- Logo (optional)
- Any text you want on the banner
- Images (optional)
Canva is full of free photos and graphics if you don’t have any images yourself.
Step 1: Canva Opening and Logging In
To kick off, launch your web browser and visit: www.canva.com.
Then, on the Canva website, click on the option to either Log in or Sign up.
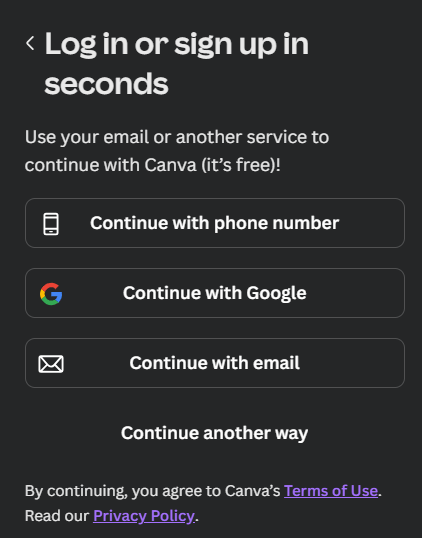
First screen: Login or sign up options
Once you select Log in or Sign up, the first screen that you will encounter will be titled “Log in or sign up in seconds.”
On this screen, Canva typically presents a few basic choices like:
- Continue with phone number
- Continue with Google
- Continue with email
Apart from these options, you will also find a link which says “Continue another way” at the bottom.
If you find the option you desire already visible, you can just make use of it. Otherwise, click on Continue another way to explore more options.
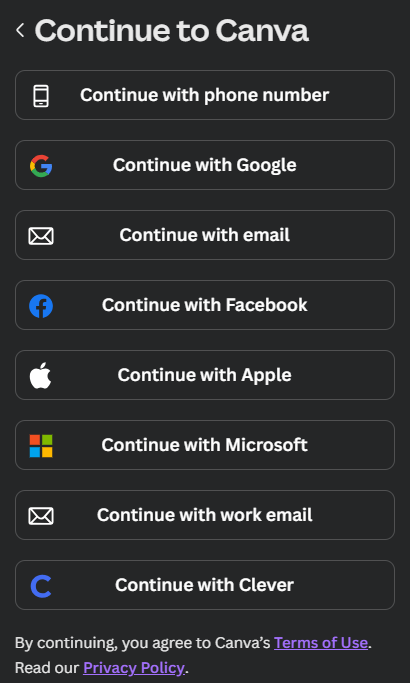
Second screen: More sign-in options
Upon clicking Continue another way, Canva will list out a more comprehensive list of sign-in options. These may consist of:
- Continue with phone number
- Continue with Google
- Continue with email
- Continue with Facebook
- Continue with Apple
- Continue with Microsoft
- Continue with work email
- Continue with Clever
You have the liberty to select any one of those options. The access to the same features and tools in Canva is provided through all options.
Important points to note
- If this is your first experience with Canva, Continue with email or Continue with Google is the simplest option
- Canva allows the creation of social media banners for free
- The options for logging in may differ to some extent depending on your device or location
After you have successfully logged in or signed up, you will be taken to the home dashboard of Canva where you can start making your social media banner.
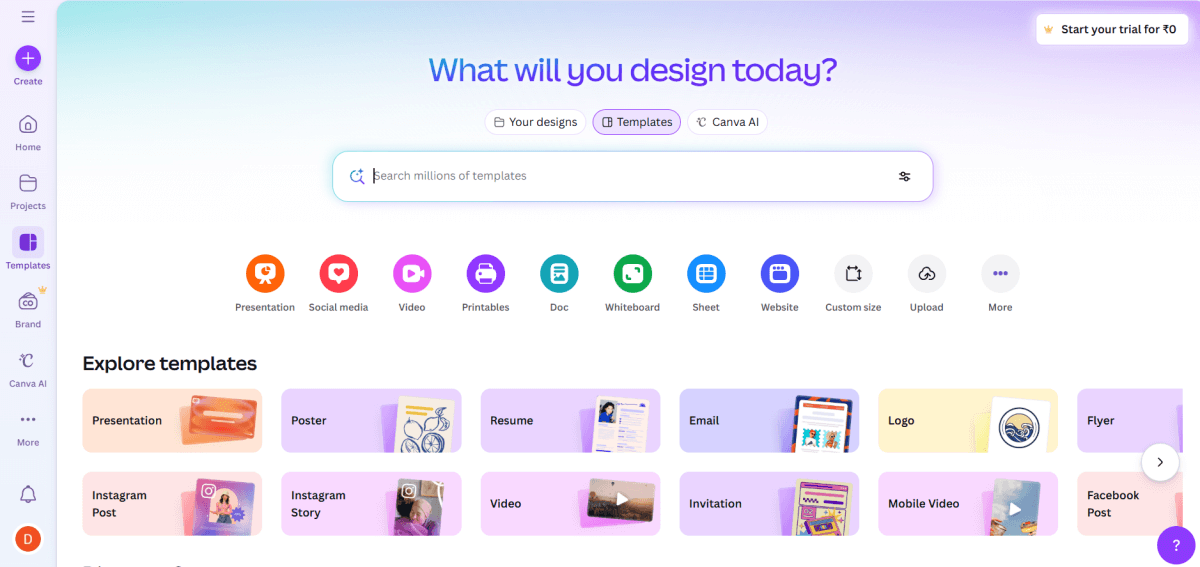
Step 2: Understand the Canva home screen
Once you have logged in successfully, Canva will direct you to the home screen.
This is where the whole design process initiates.
A big banner stating at the top of the page reads:
“What will you design today?”
Right under this banner, there is a search field.
The search field is one of the most vital features of Canva. This tool enables you to look for templates of:
- Social media posts
- Banners and covers
- Presentations
- Posters, resumes, flyers, etc.
When you create a social media banner, you will be mainly using this search field.
Top template categories
Underneath the search field, Canva displays quick-access categories with icons like:
- Presentation
- Social media
- Video
- Printables
- Doc
- Whiteboard
- Website
- Custom size
- Upload
These are shortcuts. By clicking on Social media, you will be able to view templates for Facebook, Instagram, LinkedIn, and other platforms.
Explore templates section
Moving down a bit, you will come across an area labeled “Explore templates.”
In this section, Canva provides an array of design templates that are already made and sorted by type, including:
- Presentation
- Poster
- Resume
- Logo
- Instagram Post
- Instagram Story
- Facebook Post
- Video
All the templates are clickable. Once you click a particular template, Canva takes you to the editor where you can personalize it.
Discover and trending sections
Further down, you may encounter sections like:
- Discover Canva
- Trending near you
- What’s new
- More templates for you
These sections represent the most popular and recently used designs.
Although you can ignore these sections when you are creating a banner, they can still serve the purpose of providing inspiration.
Left-side menu
A vertical menu with choices like Home, Projects, Templates, Brand, and Apps is positioned on the left side of the screen.
At this point, you just need to keep in mind two things:
- Home will take you back on this screen.
- Templates will allow you to explore designs with more precision.
Important things to remember
- It is not necessary to click on all the items on this screen.
- The search bar is the quickest way to start.
- Templates are just waiting for your edits—they are already designed.
After you get the gist of this home screen, you can look for a social media banner template, and we will do that in the next step.
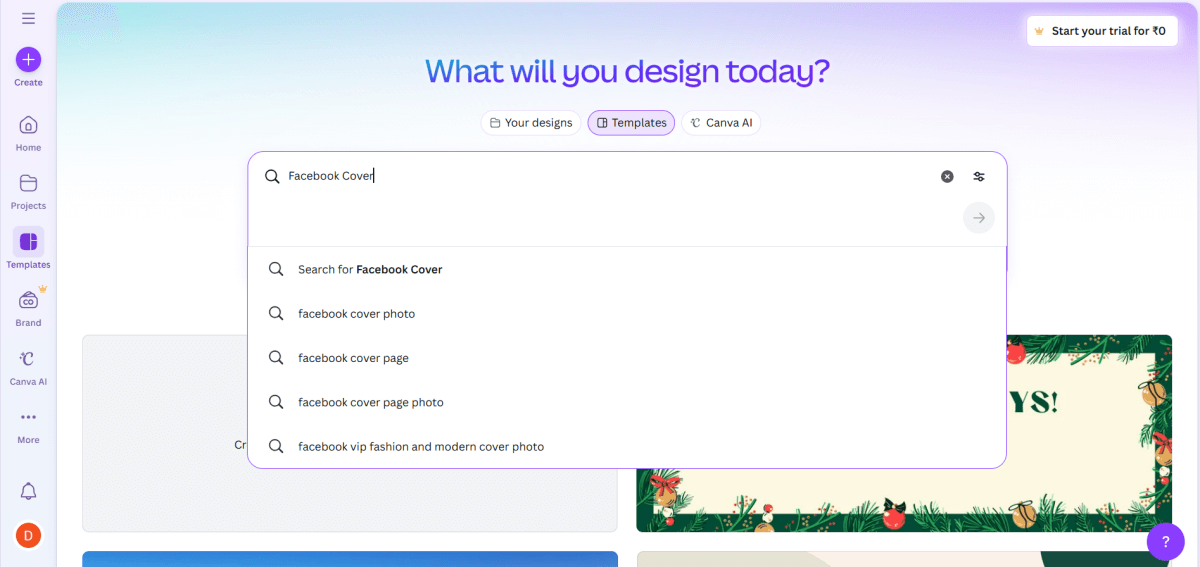
Step 3: Search for a social media banner template
Once you are now at the Canva home screen, the next action is to find the appropriate banner template through searching.
Beneath the question “What will you design today?”, a big search bar is placed in the center of the screen.
How to search:
- To begin with, click in the search bar
- And then type the name of the platform where you want to create a banner.
For instance, write: “Facebook Cover”
The moment you start typing, Canva will display a list of suggested searches under the search bar such as:
- Search for Facebook Cover
- Facebook cover photo
- Facebook cover page
- Facebook cover page photo
You have the option of:
- Clicking Search for Facebook Cover, or
- Hitting Enter on your keyboard
The outcome will be the same for both actions.
Importance of this search
Search bar usage guarantees that:
- Platform’s banner size is correct
- Your design when uploaded will be integrated properly
- No cutting of your banner’s important parts
Canva at once provides templates which are already sized and optimized for Facebook.
Alternative banner searches you can do
You may go on repeating the process for other platforms by simply typing:
- LinkedIn Banner
- Twitter Header
- YouTube Channel Art
With each search, you will get templates that are made specifically for that platform.
Once this search is done, Canva will present you with a page full of Facebook cover templates which we will choose from in the next step.
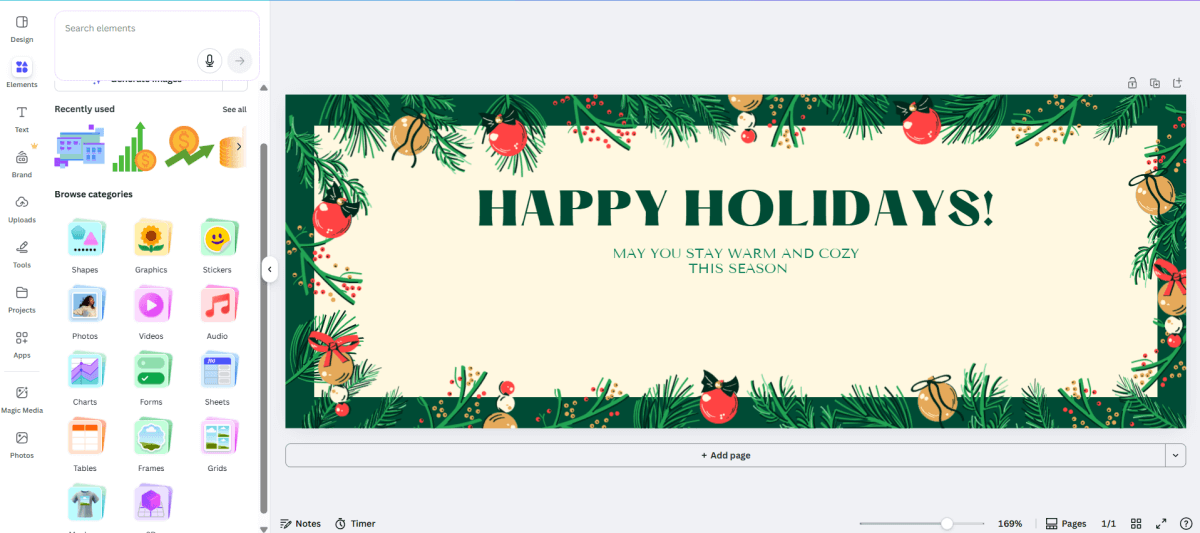
Step 4: Choose a template that matches your purpose
Templates represent already-made layouts. There is no requirement to develop your own design.
When selecting a template, consider the following:
- Is it going to be for commercial or personal purposes?
- Is it minimal or overloaded?
- Is it in line with your brand or communication?
Select the template that appeals to you the most.
Afterward, click on the option that says Customize this template.
The design editor will be opened for you now.

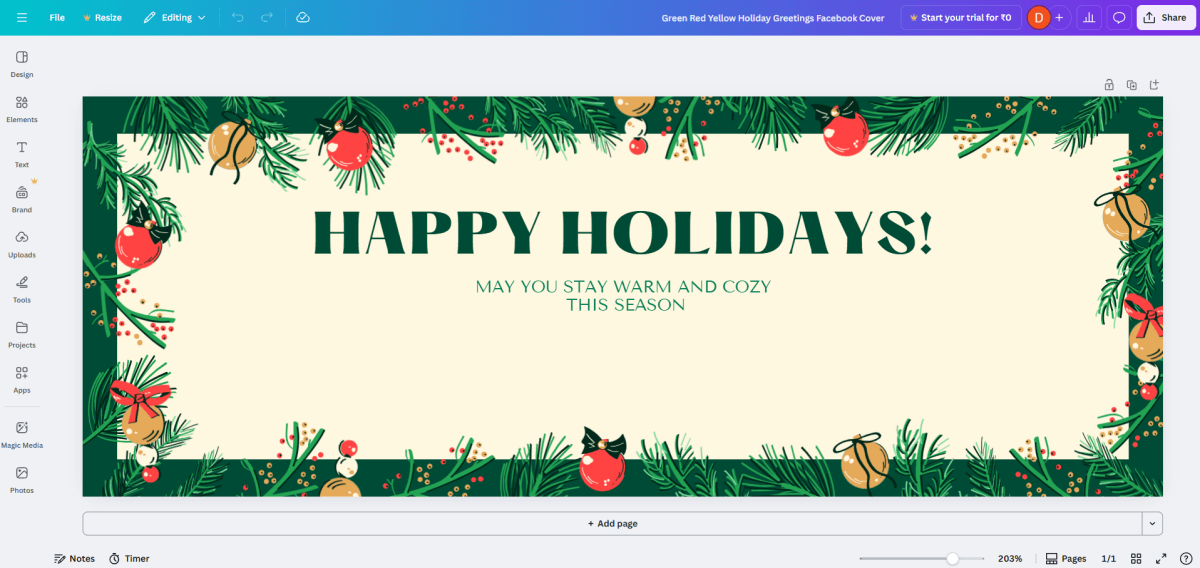
Step 5: Understand the Canva editor screen
The editor screen is opened by Canva just after choosing a template.
It is the place where your social media banner will be personalized and finished.
Although at first sight it may seem that there is just too much happening, the interface is easy to navigate as soon as you find out what each part does.
Main design area (center)
The design of your banner will be displayed in the middle of the screen.
It is the real Facebook cover (or other banner) that you are modifying.
You are allowed to:
- Click on text to make it more
- Drag elements to change their locations
- Resize parts with the help of the corners
Every single thing visible on the banner is modifiable.
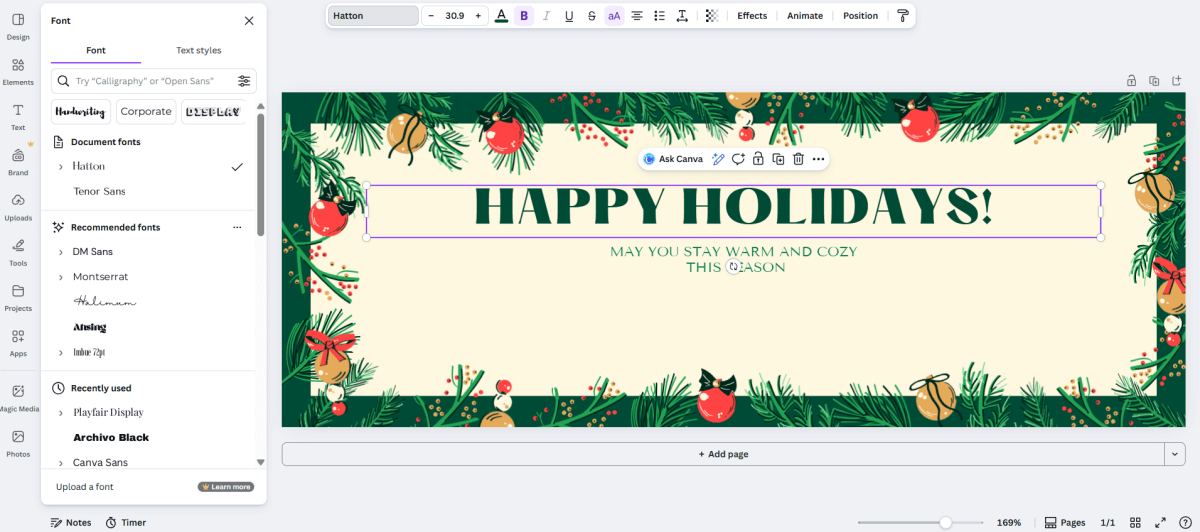
Left-side panel (tools)
A vertical panel full of design tools is located on the left side.
The tools in this panel are the means through which you will add or modify content.
Among the options, the ones used most often are:
- Design – the styles of templates
- Elements – shapes, icons, and graphics
- Text – headings and text boxes
- Uploads – your personal images or logos
- Photos / Apps – additional images and features
Text, Elements, and Uploads will be the main remaining tools for creating visually appealing banners in most cases.
Top toolbar (editing options)
Editing controls are displayed at the upper part of the screen.
They are modified according to your selection.
For instance:
- Text selection reveals font, size, and color options
- An image selection shows crop and adjust options
The Share button is found at the right side of this bar, which is the same as downloading your banner later.
Bottom section
At the bottom, you might see:
- Add page (not required for banners)
- Zoom controls for zooming in or out
Typically, a social media banner only consists of one page.
Key things to remember
- Click on anything to modify it
- Canva keeps your work saved routinely
- You can always reverse mistakes
- You are welcome to roam around, nothing can get broken
If you have already gotten to know this editor screen, then the next step will just be to edit your banner content.
Step 6: Change the text in the banner
Canva templates already have sample text.
You only need to replace it with your own words.
How to edit text:
- Click on the text you want to change
- Start typing to replace the existing text
When the text is selected, editing options appear at the top.
You can:
- Change the font
- Adjust the text size
- Change the text color
- Make the text bold or center aligned
Move and resize text:
- Drag the text box to move it
- Use the corner handles to resize it
Keep your main message clear and centered so it looks neat.
Step 7: Choose simple and readable fonts
Fonts matter more than people think.
Use:
- Clean fonts
- Easy-to-read styles
Avoid:
- Too many fonts
- Very fancy handwriting fonts
A good rule:
- One font for heading
- One font for small text (if needed)
Canva already suggests good font combinations.
Stick to those if you are unsure.
Step 8: Replace images or graphics
Images or icons are included in some templates.
The steps to substituting an image are as follows:
- Select the image
- Hit the Delete key
- Navigate to Elements or Photos
- Drag and drop a new image into the designated area
Additionally, you can upload a personal photo:
- Select Uploads
- Choose a picture from your computer
- Drag and drop it into the design
Step 9: Preview the Banner
- Before getting started with downloading, take a moment to try to view the banner as a visitor might see it:
- Ask yourself:
- Can I grasp the message in 3 sec?
- Is the page name visible?
- Do you think that the design looks busy or peaceful?
It is also a good idea to walk away and return after a few minutes and view it again with fresh eyes. It is also easier to spot minor problems such as misalignment and spacing irregularities at this point.
If possible, show the banner to others and then merely ask the following question: “Whether this is clear on-screen I do not know?”
Check:
- Spelling mistakes
- Text alignment
- Overall balance
Step 10: Download the Banner
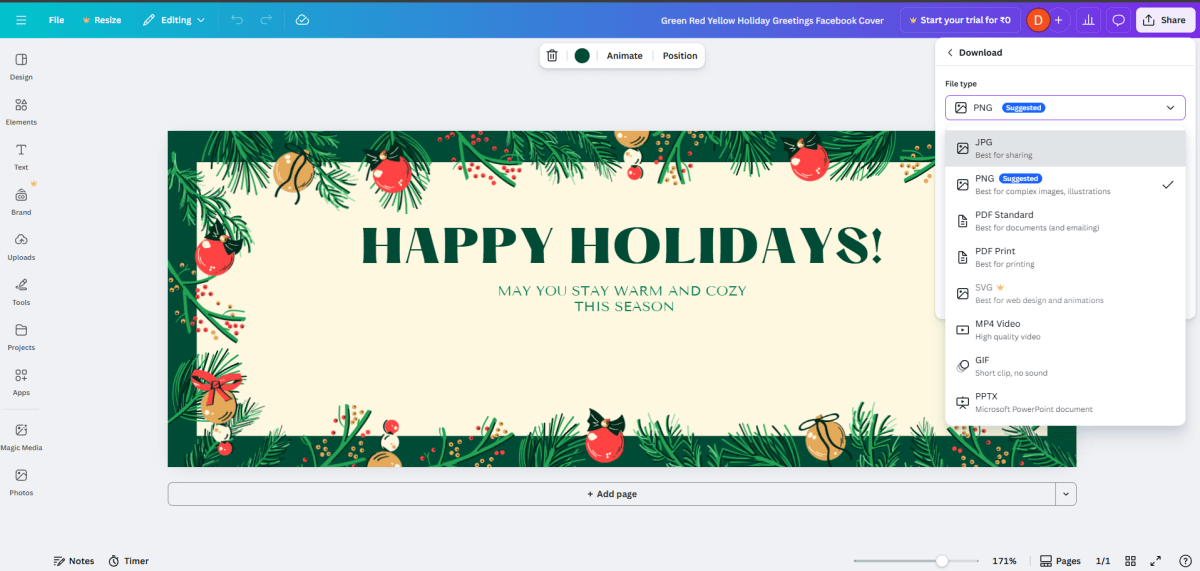
After you finish making your banner, the next step is to download it to your computer.
How to download:
- Click the Share button located in the upper right corner.
- Click on the Download option.
A download panel will appear on the right side of your screen.
Choose the type of file
Click on the File type dropdown. You will probably see options such as:
- PNG (Suggested) – The best choice for social media banners
- JPG – Smaller file size, good for quick sharing
- PDF Standard / PDF Print – Mainly for documents or printing
- SVG – For web designers (not needed here)
- MP4 Video / GIF – For animated designs
- PPTX – For PowerPoint presentations
Always choose PNG format for social media banners
It makes the text still readable and the artwork still bright.
Final download
- Set the size to default
- Do not select the compression options
- Click on Download
The banner will be stored on your computer and is now ready for you to upload it to your social media profile.
Tips for Better Social Media Banners
Here are a few practical tips:
- Update banners for festivals or events
- Keep branding consistent
- Match banner style with profile picture
- Use readable fonts
- Refresh banners every few months
A banner is not something that is going to stay the same. The thing about a banner is that you can always make changes to it.
Saving and Reusing Your Banner Design
One of the advantages of using Canva is that your designs are automatically saved.
You can:
- Create copies of a banner
- Use new text for a new campaign
- Colors of Upcoming Festivals
- Use same design on different platforms by resizing
For instance, the design of a banner on the Facebook platform can be reused for LinkedIn or YouTube with the help of Canva, where the design can be resized.
This will save you time and also maintain your brand consistency on all platforms. Eventually, you will be able to create a small portfolio of designs, which you would be able to easily update any time you require.
Final Thoughts
Making a social media banner is really not that hard. If you use Canva it is easy to do even if you are just starting out. When you follow these steps you can make a media banner that looks nice and professional and pretty. You can make a media banner, with Canva that people will like.
Take your time when you are working on something. You should try out a few templates to see what you like. Make small changes to see how they look. The more you practice making designs the better your designs will become over time.
A good banner helps people remember your page. It sets the tone. And most importantly, it shows that you care about how your profile looks.
About the Author

Anna Malik – digital nomad, enthusiast of everything online and in the cloud, productivity maniac. She travels around the world reviewing web applications and other resources for Web People for our blog.


