

How to Implement Cookie Consent Management (Consent Mode v2) for Free

Do I need to implement Cookie Consent Management?
If your website is visited by users from the European Economic Area or the United Kingdom, you must obtain their consent not only to collect their data but also to store cookies in their browsers. Consent applies not only to cookies used by your site but also to third-party cookies – such as Google Analytics.
What is the requirement for obtaining cookie consents based on?
In 2019, the Court of Justice of the European Union ruled that information on the use of cookies (opt-out) is not sufficient, and publishers must obtain user consent (opt-in) before the site stores data in the form of cookies on their computer.
In 2020, the European Data Protection Board confirmed this position by issuing appropriate recommendations. Since then, the popular “cookie bars” began to be replaced by larger pop-ups containing more buttons – for acceptance, rejection, or more detailed consent configuration.
On October 22, 2022, the European Parliament and the Council of the EU issued a regulation (“Digital Services Act”) imposing new obligations on the largest internet platforms. Consequently, with the act coming into force, on March 6, 2024, Google began to enforce the use of Consent Mode on publishers of websites using their services (including Analytics, Maps, reCAPTCHA, AdSense, AdMob, and even Fonts). Failure to comply with this obligation means limiting publishers’ access to analytical data necessary for targeting and personalization.
What is Consent Mode v2?
Consent Mode is a Google technology that allows publishers to pass information about cookie consents obtained from end-users to Google. The website asks the user for consent, and his decision is passed to Google, so that tools such as Analytics, Map, or AdSense do not use cookies unlawfully.
Consent can be given for all categories of cookies, only selected ones, or not at all (refusal).
Consent Mode v2 is the latest version of this mechanism, ensuring compliance with GDPR, CCPA, and TCF. It introduces two additional consents, compared to v1 – for sharing user data for advertising purposes and for ad personalization.
Publishers of websites displaying Google ads (using AdSense, AdMob, or AdManager) additionally must use consent management platforms (CMP) from the list of providers certified by Google.
What are the ways to implement cookie consent management?
From a technical standpoint, there are several different solutions for implementing the mechanism for obtaining cookie consents – depending on the scale and complexity of your site:
A. Local plugin
If you use a SaaS solution (e.g., WIX, Shoper) or have a relatively simple site based on WordPress, it is enough to install and configure the appropriate plugin. For WordPress, this could be GDPR Cookie Compliance or Complianz – GDPR/CCPA Cookie Consent.
B. Consent Management Platform
Using a dedicated consent management platform is recommended but involves costs. Some CMPs offer free options, but they are severely limited. The limit is the total number of subpages in the site or the monthly number of views. Free options also do not include all the features offered by platforms.
Here is what the “Free” plan looks like for three popular providers:
- CookieYes – up to 25,000 views per month; scan up to 100 subpages; does not include auto-blocking of newly detected cookies, setting custom banner colors
- CookieBot – up to 50 subpages; does not include multilingualism, consent expiration after more than 1 month, setting custom banner colors
- Cookie-Script – up to 20,000 views per month; scan up to 10 subpages; does not include setting custom banner colors.
Commercial subscriptions cost no less than $10 per month per domain.
If you have multiple domains – even within a single website (language versions), you must purchase a separate subscription for each of them.
C. Piwik PRO
Our proposal (described in detail below) is based on using two functions of the excellent analytics package Piwik PRO – Consent Manager and Tag Manager. It allows the implementation of cookie consent management (including Consent Mode v2) in up to 10 websites, with an unlimited number of domains per website.
There is a limit of 500,000 actions per month, but if you do not use Piwik PRO Analytics, the only actions that will be counted are those related to the consent banner – displays, clicks, and decisions made.
Piwik PRO, as of now, is not on the list of CMPs certified by Google. But if you do not display Google ads on your site, you do not have to worry about this. Otherwise – see point B above.
D. Custom solution
While consent management platforms enable various integrations (from plugins to APIs), operators of more complex and extensive websites and web applications may choose to have full control over consents by implementing their own software.
Guide to implementing cookie consent management for free (Piwik PRO)
Piwik PRO is an excellent tool for web analytics, a great alternative to Google Analytics.
But you don’t have to use Piwik’s analytics to manage cookie consents through it. You can still use Google Analytics.
In this guide, we assume that you are using GA4, but not using Google Tag Manager. If you use GTM, check here.
1. Check your site’s cookies
You can check what cookies your site sends to browsers using the Developer Tools in your browser.
Launch the tools (e.g., using F12) and go to the “Application” tab. On the left side, in the “Memory” section, find “Cookies” and click on your site’s address.
Alternatively, you can also use the Free online Cookie Scanner provided by Piwik. This tool will be useful later to verify your installation.
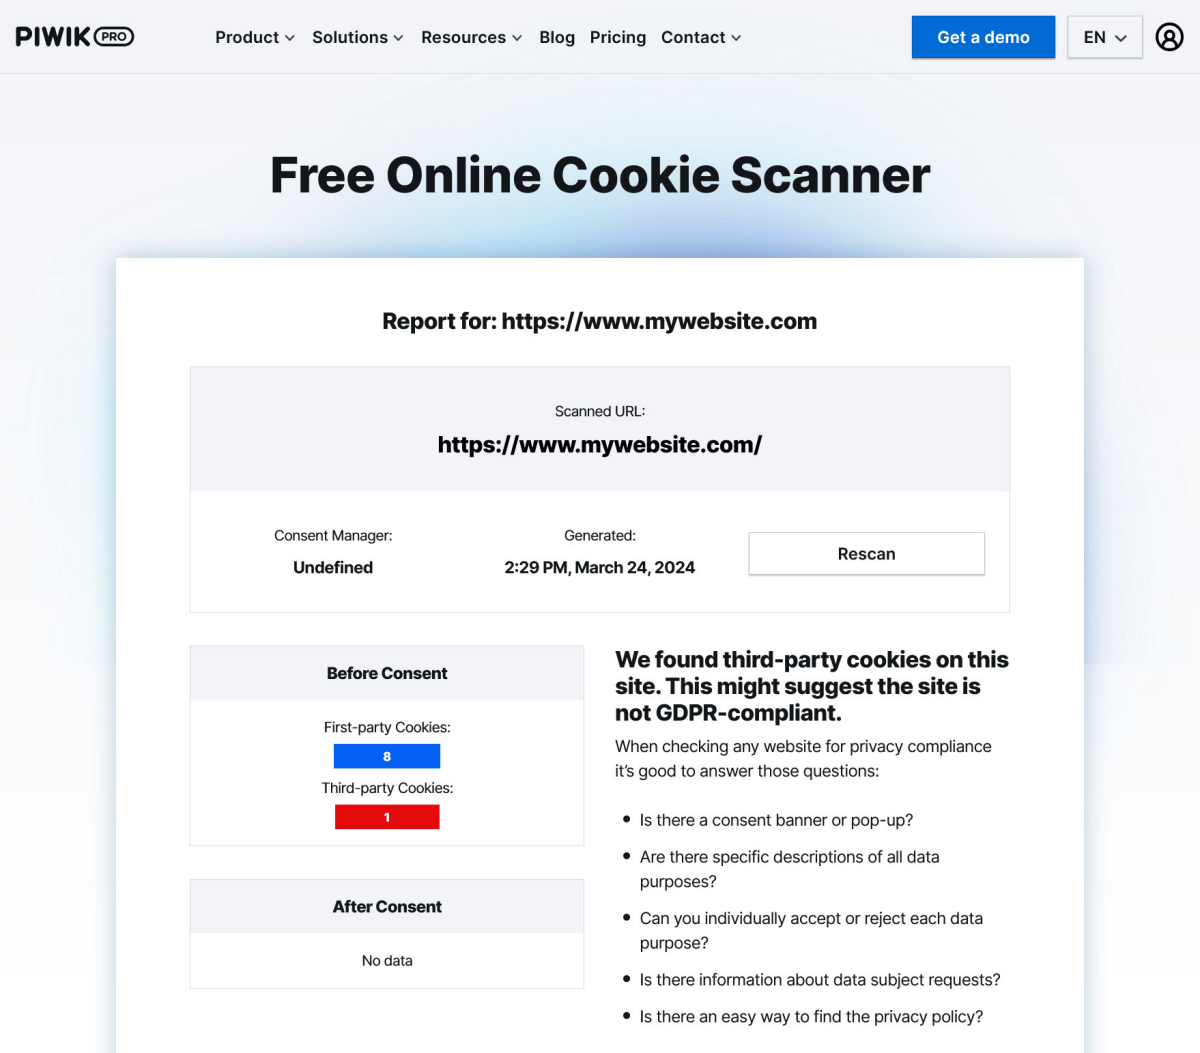
Remember to check not only the home page but also different types of subpages.
2. Create an account in Piwik PRO
Register here, providing your email address, the URL of the first site you plan to implement consents on, and the account name. Based on the account name, a dedicated subdomain will be created for you, where your user panel will be accessible – e.g., myaccount.piwik.pro.

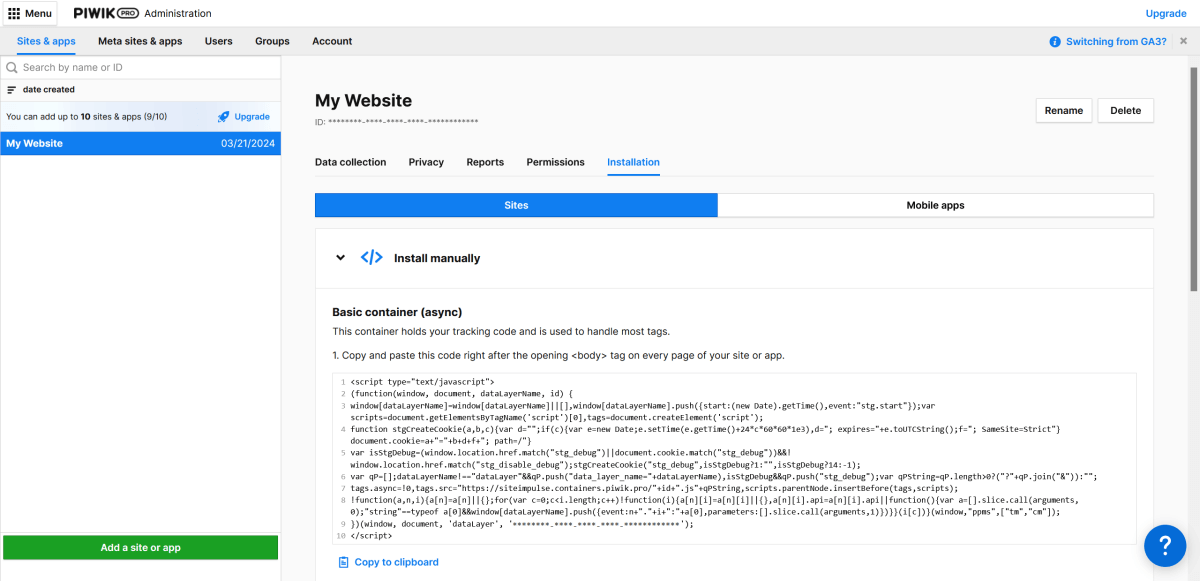
3. Install Piwik code on your site
By selecting “Menu” > “Administration” in the top left corner, you will display a list of configured sites.
Select your site, and then on the right side click “Installation”. You will see various installation methods – including “Install manually”, after selecting which you will see the code that you must insert on your site just below the opening “<body>” tag.
4. Change the Google Analytics tracking code used so far
If you are using Google Analytics 4, most likely the following code is in the “head” section of your site:
<script async src="https://www.googletagmanager.com/gtag/js?id=IDENTIFIER"></script>
<script>
  window.dataLayer = window.dataLayer || [];
  function gtag(){dataLayer.push(arguments);}
  gtag('js', new Date());
  gtag('config', 'IDENTIFIER');
</script>
Change it to the following, which includes the default refusal to store any cookies:
<script async src="https://www.googletagmanager.com/gtag/js?id=IDENTIFIER"></script>
<script>
window.dataLayer = window.dataLayer || [];
function gtag() { dataLayer.push(arguments); }
gtag('consent', 'default', {
  'ad_user_data': 'denied',
  'ad_personalization': 'denied',
  'ad_storage': 'denied',
  'analytics_storage': 'denied',
  'region': ["AT", "BE", "BG", "HR", "CY", "CZ", "DK", "EE", "FI", "FR", "DE", "GR", "HU", "IS", "IE", "IT", "LV", "LI", "LT", "LU", "MT", "NL", "NO", "PL", "PT", "RO", "SK", "SI", "ES", "SE", "UK", "CH", "BR"],
  'wait_for_update': 1000
});
gtag('js', new Date());
gtag('config', 'IDENTIFIER');
</script>
Alternatively, you can move this code to Piwik Tag Manager, but then you need to remember to set the order of tags (see point 10 below).
Do it as follows:
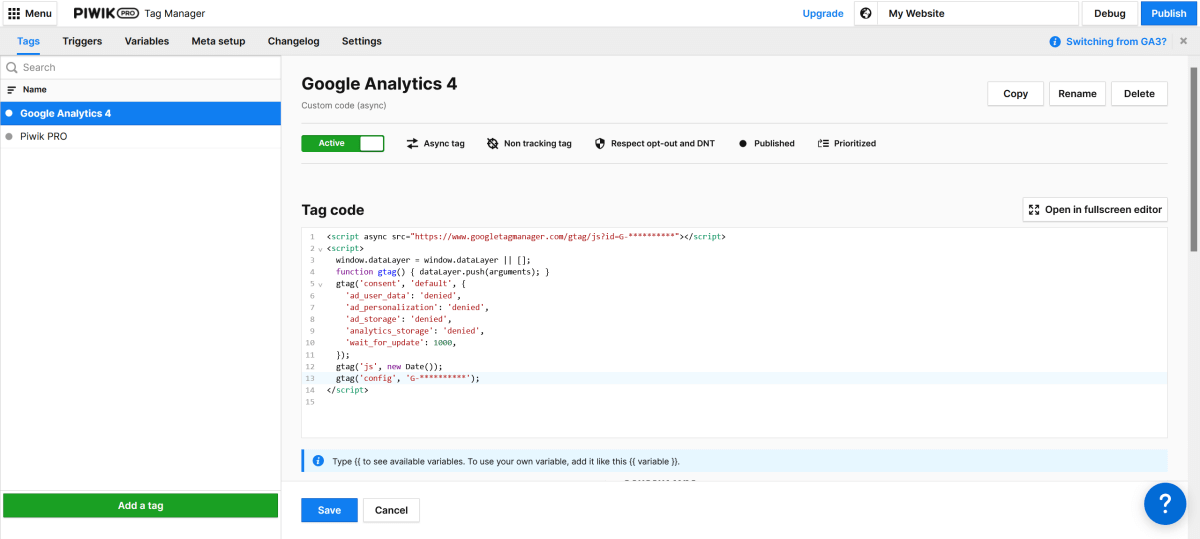
“Menu” > “Tag Manager” > “Tags” > “Add a tag”
Tag name: “Google Analytics 4”
Tag type: “Async tag” > “Custom code (async)”
“Next”
in the next step:
Tag code: here you paste the above code
Consent type: “No consent is required”
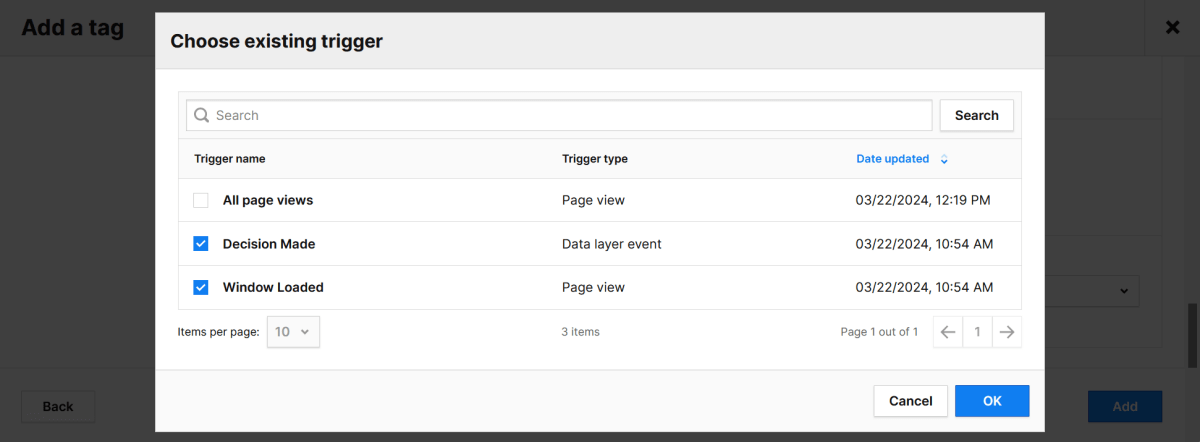
Tag triggers: “Choose existing trigger” > “All page Views”
“Add”
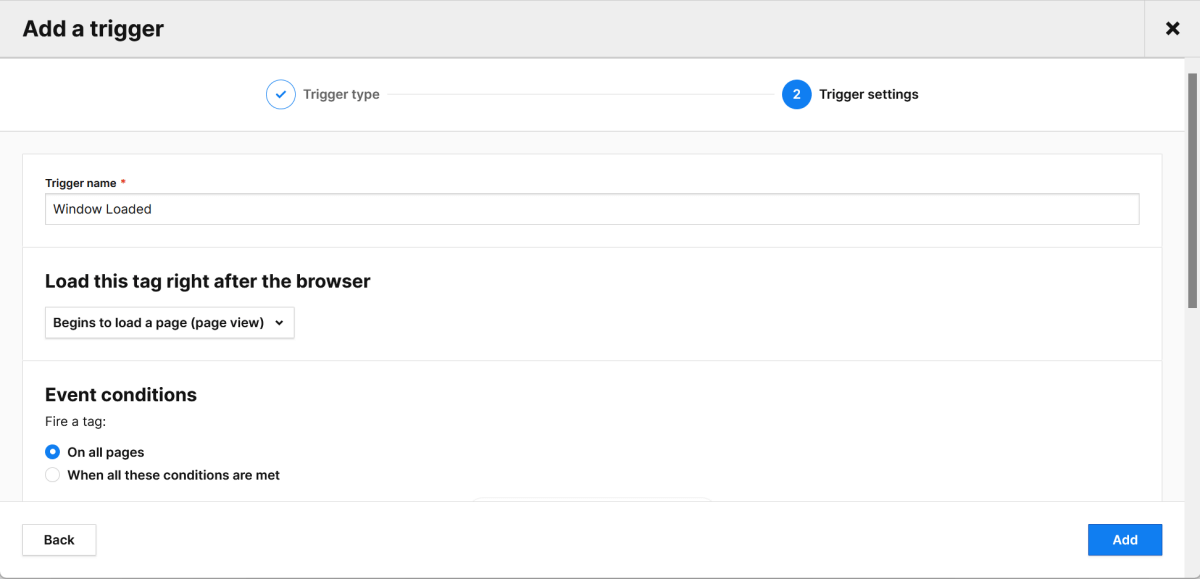
5. Create Two New Triggers
“Menu” > “Tag Manager” > “Triggers” > “Add a trigger”
Trigger name: “Window Loaded”
Trigger type: “Page view”
“Next”
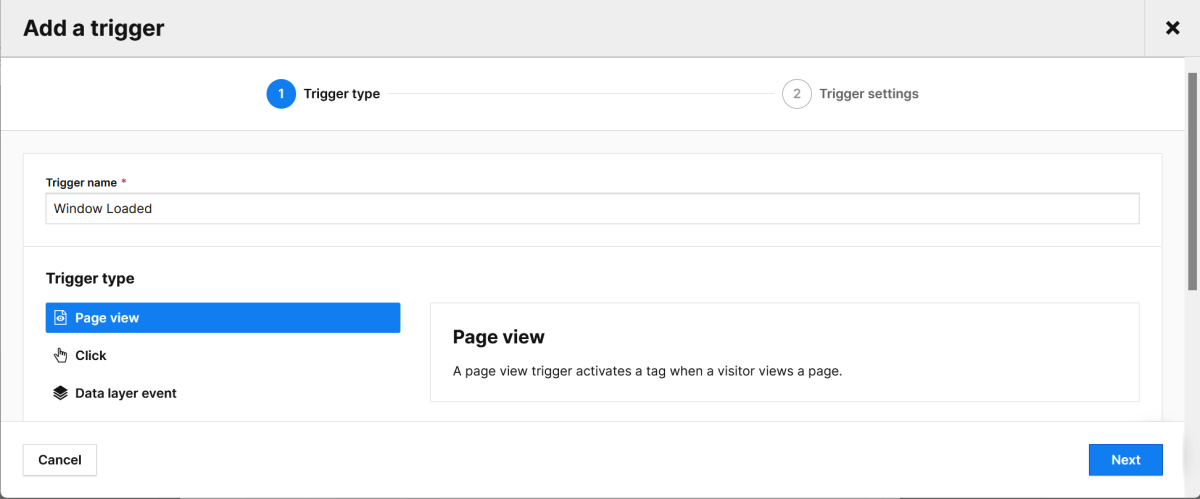
Load this tag right after the browser: “Loaded all page elements (page load)”
“Add”
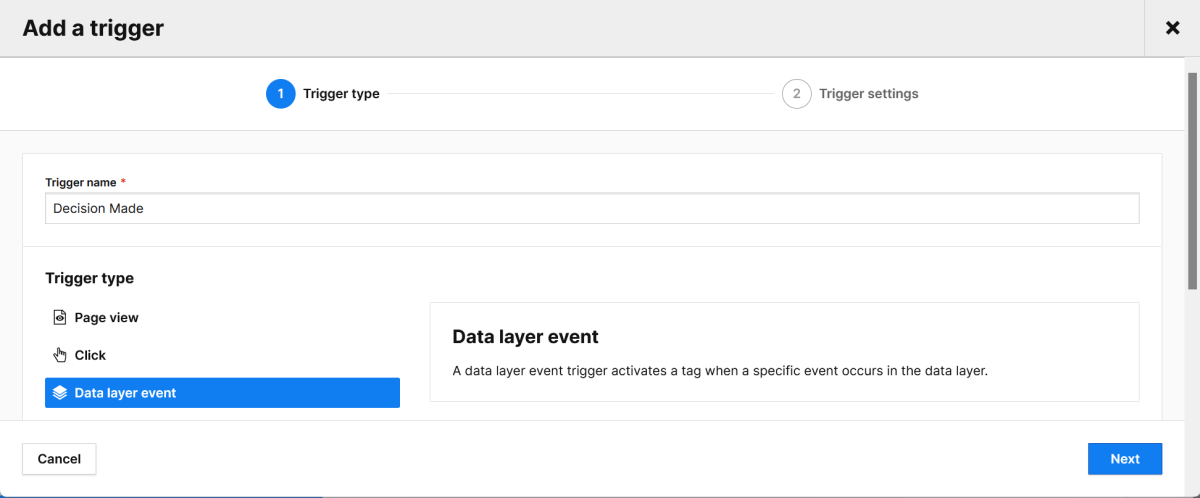
“Menu” > “Tag Manager” > “Triggers” > “Add a trigger”
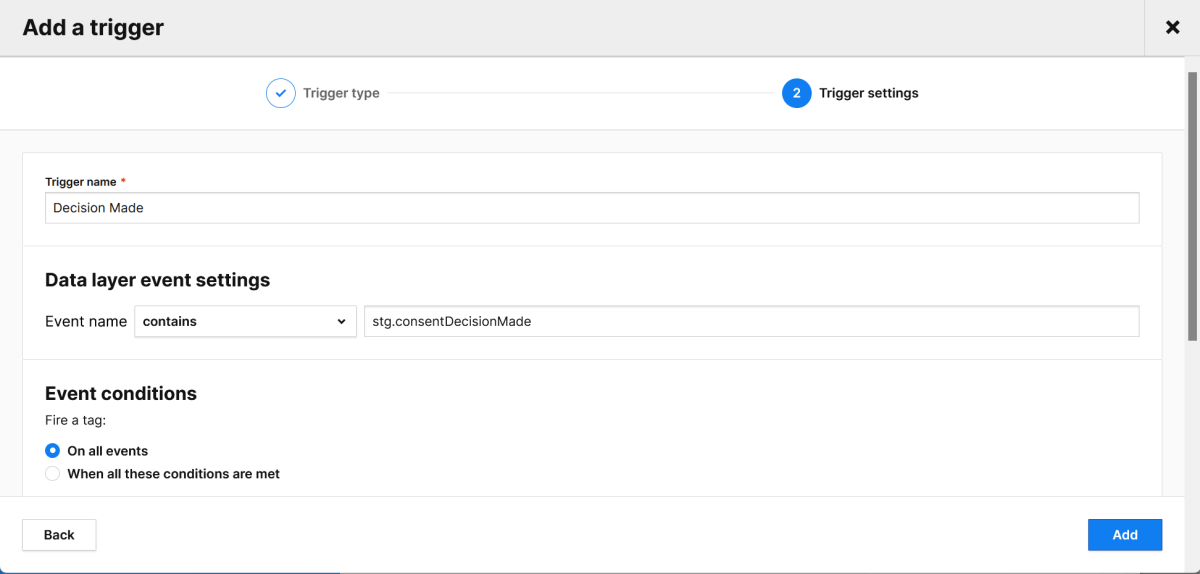
Trigger name: “Decision Made”
Trigger type: “Data layer event”
“Next”
Event name: “contains”, “stg.consentDecisionMade”
Event conditions: “On all events”
“Add”
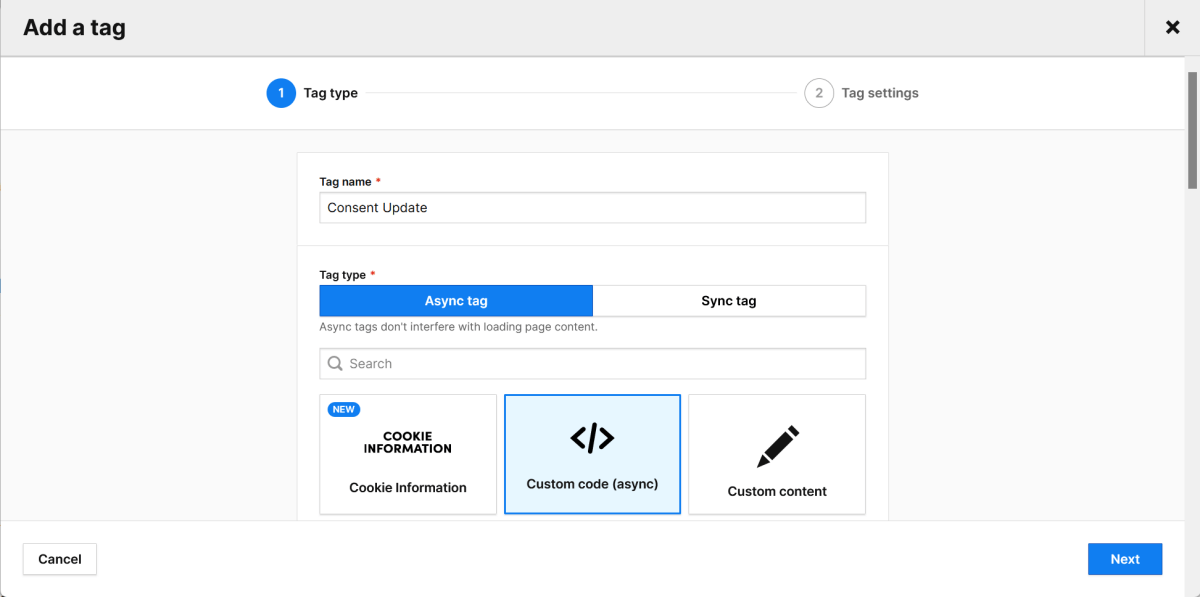
6. Create a New Tag with the consent update code
“Menu” > “Tag Manager” > “Tags” > “Add a tag”
Tag name: “Consent Update”
Tag type: “Async tag” > “Custom code (async)”
“Next”
In the next step:
Tag code:
<script>
    window.gtag = window.gtag || function(){dataLayer.push(arguments)};
    function googleConsentModeMapping(consents) {
        if ({{ Consents }}) {
            var consObj = {};
            Object.keys(consents).forEach(function(consent) {
                consObj[consent] = ({{ Consents }}.current_state[consents[consent]] === 1) ? 'granted' : 'denied';
            });
            gtag('consent', 'update', consObj);
        }
    }
    googleConsentModeMapping({
        "ad_storage": "remarketing",
        "ad_user_data": "remarketing",
        "ad_personalization": "remarketing",
        "analytics_storage": "analytics"
    });
</script>
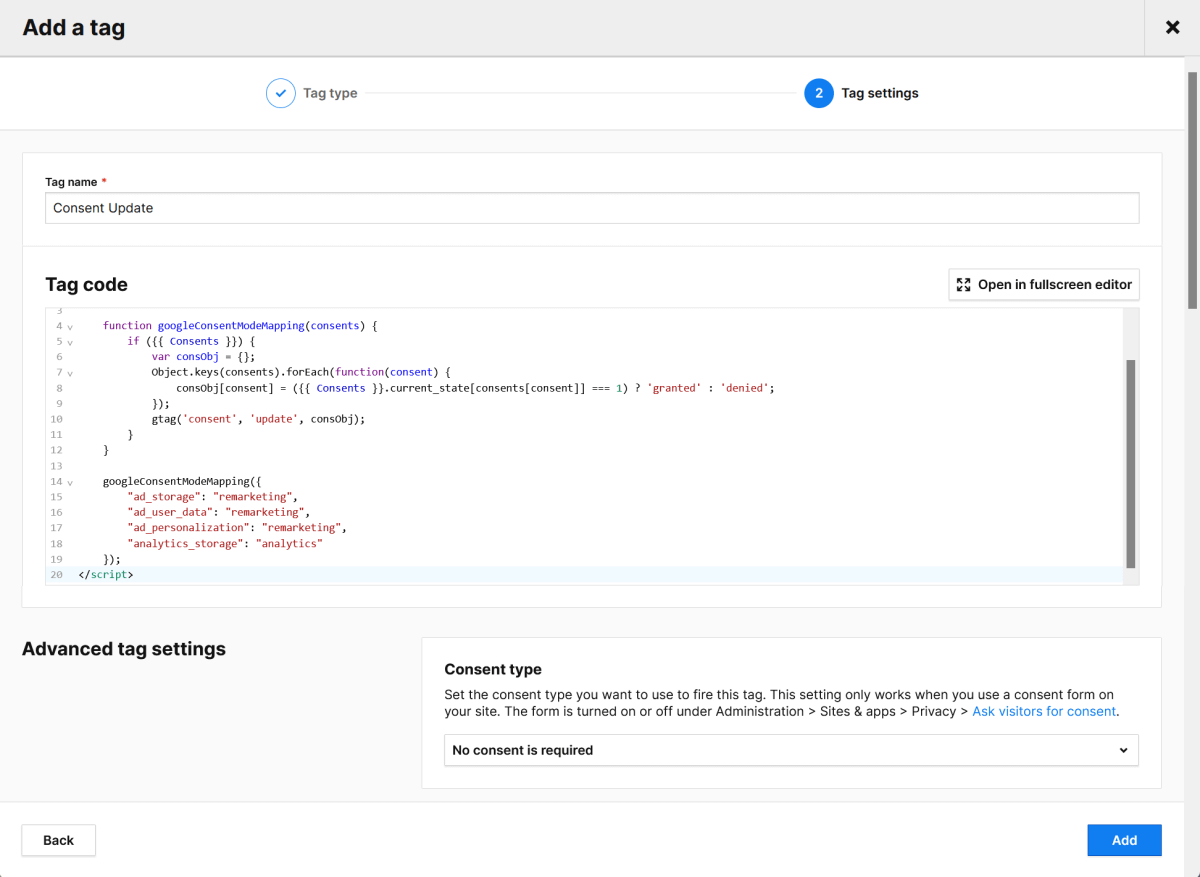
Consent type: “No consent is required”
Tag triggers: “Choose existing trigger” > “Window Loaded” and “Decision Made”
“Add”
7. Decide whether you will use Piwik PRO analytics
If you want to use Piwik PRO Analytics (recommended), you don’t need to do anything else.
Just remember that every recorded event (page view, scroll, link click, etc.) will count towards the previously mentioned action limit of the free account (500,000 per month).
If you don’t want to use Piwik PRO Analytics, perform the following two actions:
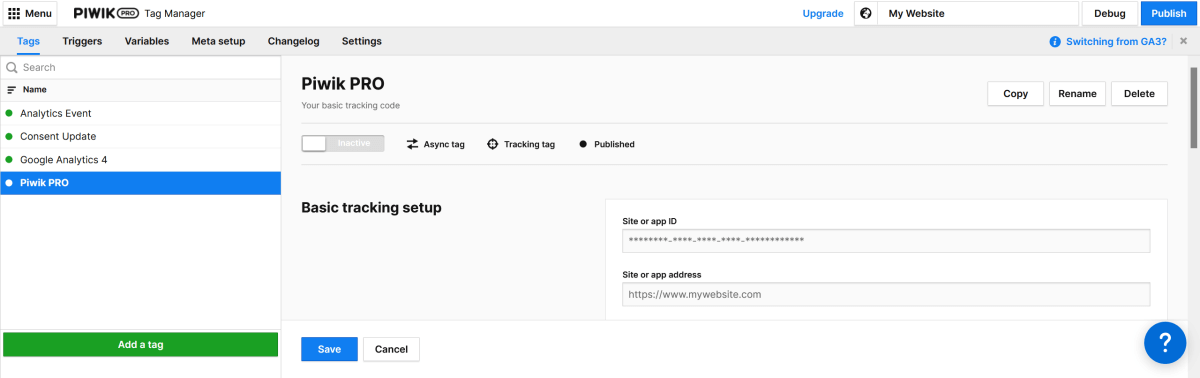
Disable the Piwik PRO tag:
“Menu” > “Tag Manager” > “Tags” > “Piwik PRO” > “Active” -> “Inactive”
Add a new tag with empty code that will trigger the consent banner on the site:
“Menu” > “Tag Manager” > “Tags” > “Add a tag”
Tag name: “Analytics Event”
Tag type: “Async tag” > “Custom code (async)”
“Next”
in the next step:
Tag code:
<script></script>
Consent type: “Analytics”
Tag triggers: “Choose existing trigger” > “All page Views”
“Add”
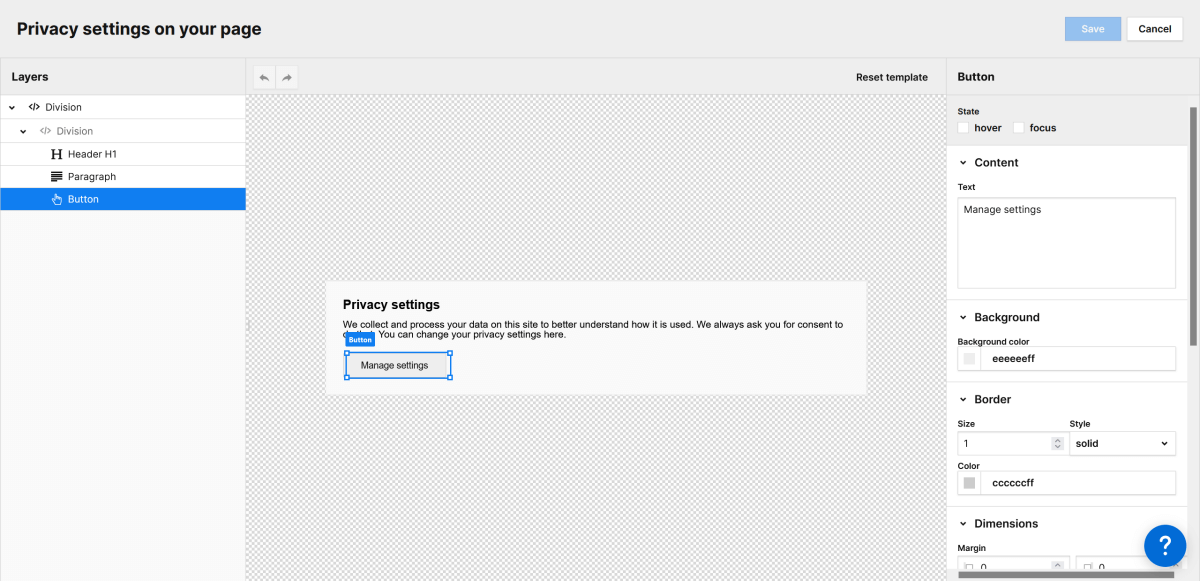
8. Configure the consent banner and customize its appearance
“Menu” > “Consent Manager” > “Settings”
Here you will define, among other things, the languages in which the consent banner will be displayed.
The banner’s language will automatically be displayed in the user’s browser language. I suggest leaving English set as default.
If you know that users of your website speak other languages, add them as well.

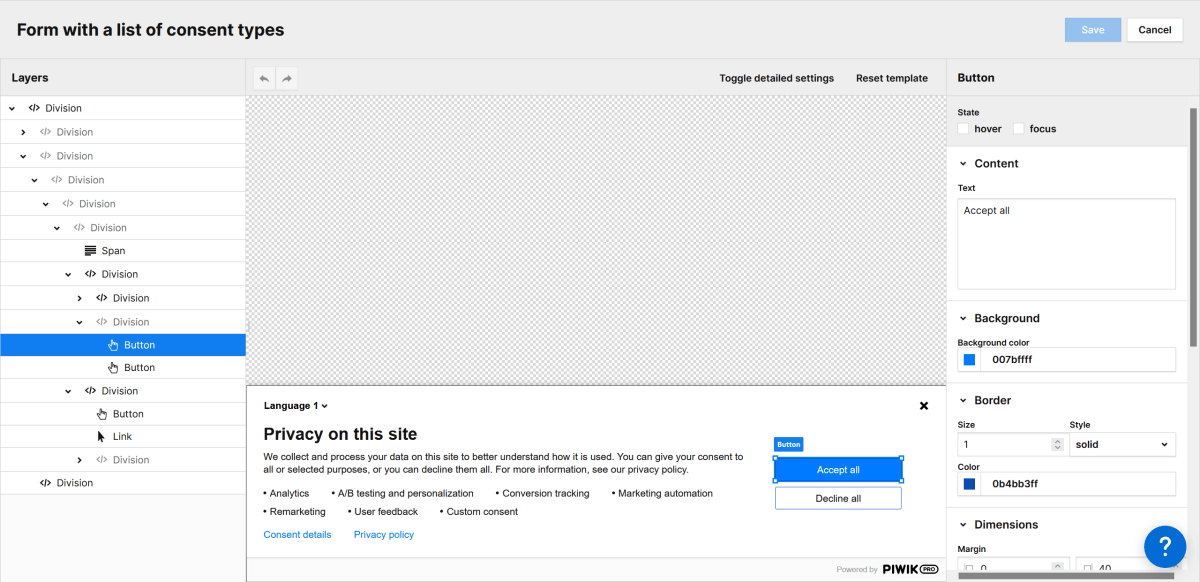
“Menu” > “Consent Manager” > “Forms” > “Consent forms”
Here you will configure the layout, colors, and fonts – as well as edit contents and links (e.g., to the Privacy Policy page).
In addition to the consent banner, you will also format the appearance of the reminder bar here. This bar will be displayed if the user continues to use the site without making a decision about cookies.
According to the changelog of Piwik PRO, from version 6.0.1, it is possible to hide the footer with the “Powered by Piwik PRO” logo.
However, I could not find this setting in the panel, and I do this using the following line added to the CSS of my site:
#ppms_cm_footer {display:none !important}
9. Use the code allowing users to edit consents
“Menu” > “Consent Manager” > “Forms” > “Privacy policy”
Here you will find the code that you can paste on your site – e.g., under the Privacy Policy.
It will allow users to edit the consents given and, if necessary, create privacy-related requests. You will find them later in the section “Menu” > “Consent Manager” > “Requests from visitors”.
10. Set the order of tags (optionally)
If you did not insert the GA4 tracking code directly on the site, but as a tag (see point 4), set the execution order of tags:
“Menu” > “Tag Manager” > “Settings” > “Tag priority”.
Move all tags from “Available tags” to “Prioritized tags” and drag the “Google Analytics 4” tag to the very top.
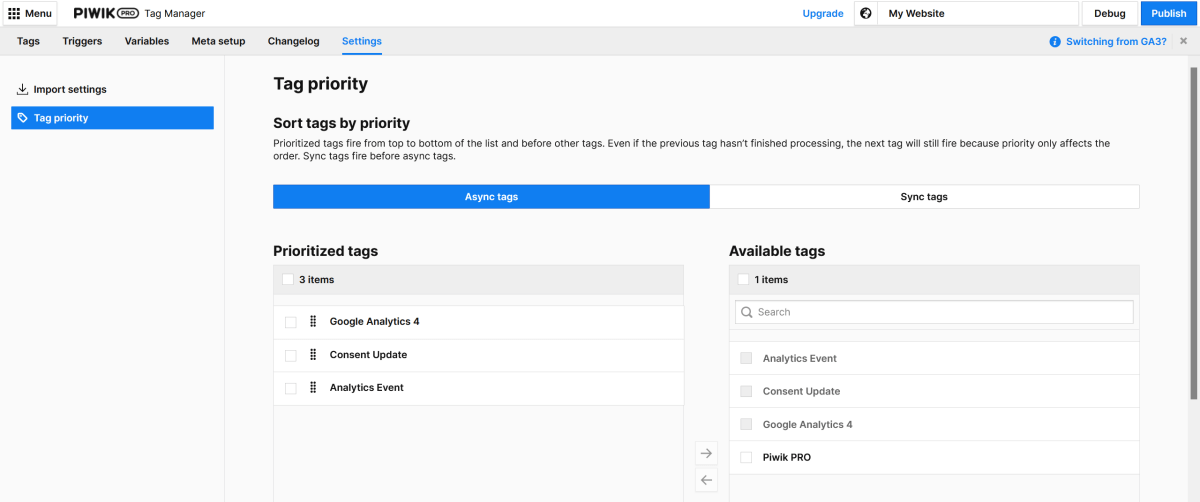
Don’t forget to click “Save”.
11. Publish changes in Tag Manager
All changes you have made in Tag Manager (introduced Triggers, Tags, set order) are saved as a “draft”.
To make them active, you must publish them by clicking the “Publish” button located in the upper right corner of Tag Manager
“Menu” > “Tag Manager” -> “Publish”.
12. Verify oroper functioning of consent management
Similarly, as in point 1 – use the Free Cookie online Scanner or Developer Tools of your browser to check (best in an incognito window):
- whether before giving consent and after its denial, the site does not store any cookies, except for necessary ones (i.e., those of the Consent Manager or session cookies)
- whether after giving consent, the expected cookies (e.g., Google Analytics) appear.
In the described way, you can also implement cookie management for other third-party sites – e.g., Facebook, Hotjar.
Basic vs. advanced implementation
When configuring tags, the “shortcut” path is tempting – creating a tag with the Google Analytics tracking code, triggered in the case of consent to analytical cookies. This is known as basic implementation.
Although from a legal standpoint this solution is correct (Google Analytics will not save any cookies without consent because it simply will not work), the analytical data will be heavily distorted.
If the GA tracking code is activated only after obtaining consent, absolutely no data will be collected on visits where consent was not given.
In the instructions above, I applied the advanced implementation, in which the tracking code is activated immediately, but by default, it blocks the storage of cookies. Thus, even if consent for using cookies is not given, anonymized signals will be sent to Google Analytics. Based on such signals, using behavioral modeling, Google Analytics will be able to estimate the number of users and visits close to reality.
Sources: Set up consent mode on websites (Google for Developers)
Google consent mode v2 integration (Piwik PRO Help Center)
Detailed Guide of The Google Consent Mode v2 Integration For Piwik Pro Customers (Dumb Data)
About the Author

Robert Koch – experienced SaaS application designer and business optimization through automation consultant. An avid home brewer and cheesemaker in his spare time.


